MEMBERPLANET BLOG
  • Log in
  • Sign up
  • Blog
  • Categories
    • Emailing
    • Event Planning
    • Fundraising
    • Leadership
    • Member Management
    • Mobile
    • New Features
    • Pro Tips
    • Reporting
    • Social Media

3 Steps to Make the Most of Your Fall Fundraising Event

6/10/2019

0 Comments

 
Autumn is a great time; the leaves are changing, the days are growing shorter, and for many PTA leaders, that means fundraising events. From PTA-only events to community-wide fundraisers, you want them all to be as successful as possible. Managing and promoting your event online is the surest way to boost your turnout. It allows you to track RSVPs, collect funds, and follow up; you can also share an event page on social media to increase its visibility, and have your members do the same on their social media.  It’s time to stop using Excel spreadsheets to track RSVPs, emailing maps and directions to attendees, and hoping that your flyers are seen. Follow these instructions for setting up your next fundraising event online, including personalizing it to your needs, adding RSVPs, and sharing it via social media. 
event tickets
Create an event on memberplanet
  1. In the left navigation bar, hover over Events and click Create an Event in the submenu
  2. Fill out the standard event information: event title, start and end times, venue, address, and a customized description of the event 
Note: The description field is your chance to detail the event in a personal way. Spruce it up and get your members and guests excited about coming. The more descriptive the better.
​    
    
3.  Click Save & Customize

Personalize your event page: Adding a personal touch to your upcoming fundraising event is a great way to boost excitement, and better establish a connection to your group.  The more engaged members are in an event, the more successful it will be.


create an event
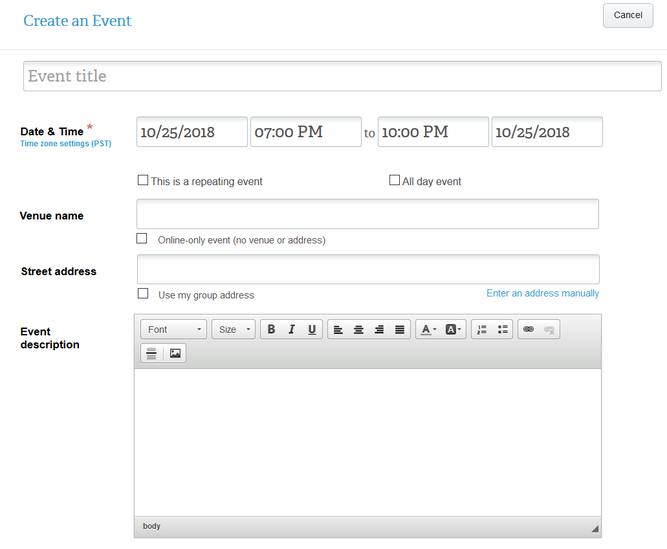
​     4. On the Event Page features list, select Customize With Videos, Images, & Other Content

From here you can customize the following:
  • Event page URL
  • Header
  • Banner image (900 px wide recommended)
  • Description box (520 px recommended for photos)
  • Videos
  • Photo albums
  • Comments

​     5. To edit each section, simply click on the section and make desired changes
     6. When finished, hit Save & Close
     7. To publish your event site, click the Publish Now button 

customize event
Enable RSVPs for your event
After you’ve created an event, you have several options for creating and managing your RSVPs.
  1. On the RSVPs & Tickets section, select RSVP Options
  2. Use the dropdown menus to customize when your RSVPs will open and close 

​RSVPs can begin based on when the event is published, by specific date and time, or by the number of days before the event starts. Options to choose your specific date and time or number of days will pop up upon selection.

Note: Closing your RSVPs will not close your event, so members and guests will still be able to view the event page.
​
      3. Click the Save & Close button
Sell tickets to an event
Admins can sell tickets on an event site through the platform.
  1. On the left navigation bar, hover over Events and select Manage Events
  2. Click on the event name
  3. Scroll down to the RSVPs & Tickets section and select Tickets & Payment Items
  4. Click New Ticket/item button
  5. Fill out the fields to set price and limits

Admins can check the Required to Attend the Event box to make the tickets mandatory.

     6. Hit Save

For more ticket/items, click New Ticket/item and repeat the process.

​     7. Click Save & Close when done
sell tickets to an event

Do more than yell from the rooftops to spread the word
​Now that you have your event site all set up, make the most of the platform's multi-channel communication features and help your event excel. Take advantage of email campaigns, social media, and group text to share your specific event site, and take the burden off using flyers as your primary outreach. The final piece to maximizing your reach, and thereby your turnout, is providing a link directly to your event that your members can also share on their social networks and communication channels.  The following instructions will take you through the steps to redefine your event promotion strategy.
Send invitations
  1. On the left navigation bar, hover over Events and select Manage Events
  2. Click on the event name
  3. Scroll down to the Guest list & Invitations section and select Customize & Send Invitations
  4. Customize your invitation by clicking on the subject line and the body
  5. On the Send Invitations dropdown menu, select when the invitations will be sent
Note: If you get a pop-up notification that the event is not published, you can still proceed, but remember to click Make This Event Live on the following page, unless you specifically intend to keep the event hidden. Your event will remain hidden until you publish.

     6. Click Send OR if you chose a later send date, click Schedule & Close

Share an event on social media and an external site
  1. On the left navigation bar, hover over Events and select Manage Events
  2. Click on the event name
  3. Choose from the quick links to share your event on various social media channels 
share event on social media
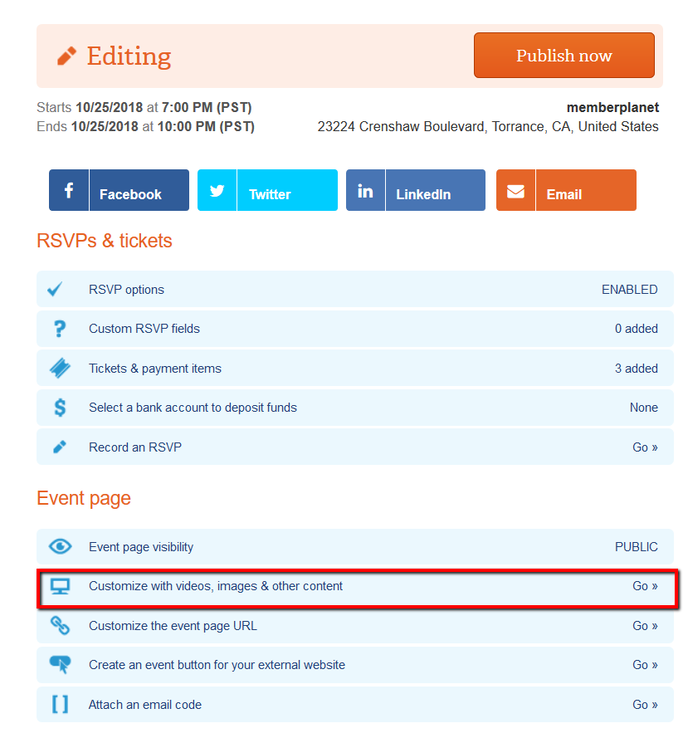
Here’s how to create a clickable button to your event site, which you can share on an external site:
  1. Scroll down to the Event Page section and select Create an Event Button for Your External Website
  2. Admins have one of two options to select:
  • Choose a Button: Use the dropdown menu to select the desired button text, then click on the color of your choice.
  • Upload Your Own Image: Click the Choose Image button, and drag and drop your desired image into the allotted area, or click to browse and upload. Complete the prompts to upload and crop your image if needed, then click Get Code Snippet.
Note: Recommended image size is 580 px wide or smaller.

A shaded box will contain the HTML code for your button.
​

    3.  Copy the entire segment, and paste it into your website

Send thank-you messages - they’re the cherry on top
The thank-you message, regardless of its iteration, will always have a more powerful reach than fathomed. Volunteer leaders can create a personalized thank-you message that they set and forget, and it will automatically send when members RSVP to events. It’s worth spending a few minutes on this because it will consistently resonate with members and deepen their connection with the group.

  1. In the RSVPs & Tickets section, click RSVP Options
  2. Select the checkbox next to Add a Thank-you Message to the Confirmation Email
  3. Write a new email message that will be sent to guests upon RSVPing
​
This is where admins can craft a custom thank-you message.


​     4.  Select the Save & Close button
​ 
These event site features are designed for PTA leaders to make the most of their next PTA event as well as their time. Create larger turnouts, take advantage of simpler event management, and then reap the rewards, which will be passed directly to those who need them most: the students. 
Get Started
PTA Simplified is a series of tips for PTA and PTO leaders to get the most out of  a powerful association management system – to manage, engage, and grow their membership all year long.

Updated since original publication on 10/20/17.
Picture

About Greg Beilstein

As the Director of Onboarding and Engagement, Greg loves helping groups get started on the platform. A memberplanet system pro, he works with admin leaders to better engage their members. In his free time he likes to play video games and brew the perfect cup of coffee.

0 Comments

Your comment will be posted after it is approved.


Leave a Reply.

    Categories

    All
    Emailing
    Event Planning
    Fundraising
    Leadership
    Member Management
    Mobile
    New Features
    Officer Transition
    Pro Tips
    PTA Simplified
    Reporting
    Social Media

Who we serve
Associations
Nonprofits
Fraternal Organizations
Schools
Educational Foundations
Booster Clubs
Military
Faith-based
Homeowners Association
Political Campaigns
PTAs
Fraternal Undergrads
Fraternity Alumni
Sorority Undergrads
Sorority Alumnae
Fraternal Orders
Music Schools
Features
Overview
Membership Management
Events
Fundraising
Communication
Online Payments
Websites
Mobile App
Invoices
Group Text Messaging


​Pricing
Subscription Plans & Pricing
Enterprise Pricing
Case Studies


Support
Support Center
888-298-8845
Email Us


Company
Blog
Download Our App
Picture
Picture
Legal
Terms of Service
Privacy Policy

Picture
© 2021 memberplanet, LLC. All rights reserved.
  • Log in
  • Sign up
  • Blog
  • Categories
    • Emailing
    • Event Planning
    • Fundraising
    • Leadership
    • Member Management
    • Mobile
    • New Features
    • Pro Tips
    • Reporting
    • Social Media